Use the current version of i1-Profiler to linearize custom Quad Tone Rip profiles

BLOG
Every Journey Needs a Journal
Something I think about quite a lot are the photographers that have shaped how we think, talk, and go about making photographs. I have been wanting to start a series that looks at certain "themes" and step back to look at the early influences of those ideas and themes and what they can teach us about the picture making experience, composition, printing. While they might not have agreed with being known as "masters of photography" their influence will last long into the future.
I was in the middle of writing such a post tonight when I leaned that photography lost one of those modern masters today. Ray Metzker has passed away at the age of 83. His current show of unique gelatin-silver photographs, constructions, and works on paper—unique as in the only one in existence—is appropriately titled One and Only, and runs through October 25th at the Lawrence Miller Gallery in New York.
Ray K. Metzker, American (b. 1931). Feste di Foglie, Italy, 1985 © Ray K. Metzker, Courtesy of the Laurence Miller Gallery.
Metzker's work is an example of how a photographic vision can continue to grow throughout the life of the artist as ideas are explored and expanded upon over a full career of genuine creativity. The tonal, structural, and temporal constructions in his earlier photographs and experimentations influenced his later straight photographs with the same sense of complexity and structural ambiguity. His book, LANDSCAPES, is one of my personal favorites, and influences in the way that it deals with light and the liveliness of trees.
He came into photography during the fervent time of the 1960s, when the medium was still struggling to be "accepted" as a legitimate art form, and coming away from the "West Coast/East Coast/European" influences that began in the 1930s. In a way, his early photographs could only have been made at that time between the 1960s and 1970s. The techniques and spontaneity and delayed feedback allowed the photographers to create pictures in a much more freely than it is now possible.
I doubt that the same kinds of photographs would be made with today—it is too easy to look at the back of the camera to see if you got it. It doesn't allow for as much discovery if you are always worried about "getting it". Additionally I doubt they would be recognized and valued in the same way if they were made today with todays digital technology and editing tools; the analogue techniques for creating those kinds of composites and multiple exposures were so much more difficult to do well, the digital equivalent might now just be seen as gimmicky and ineffective.
In any case, the thing that drives masters of any medium is that they all set out to create work that is interesting to them personally, which is really what we respond to as viewers and why they will be remembered as great artists.
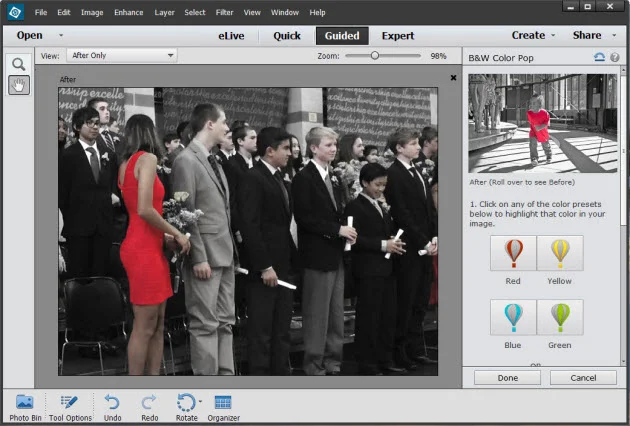
I was thinking a lot about the different Black and White workflows, and digital editing workflows as a whole after the Photoshop Elements post I made yesterday. I think there is a case that it is better to choose one or two methods and get really good with them and then ignore all the rest, no matter how much better or easier people claim the new thing might be. I have as hard a time as anyone with that—I am testing and writing a review of the new release of Capture1 Pro 8 (changing the name might be an improvement too). The point is the more time spent learning different software and workflows the less time/energy/bandwidth there is to focus on the work. It is up the the user to define what their intention for the work is and balance tools/software/workflows with image quality requirements and personal preferences.
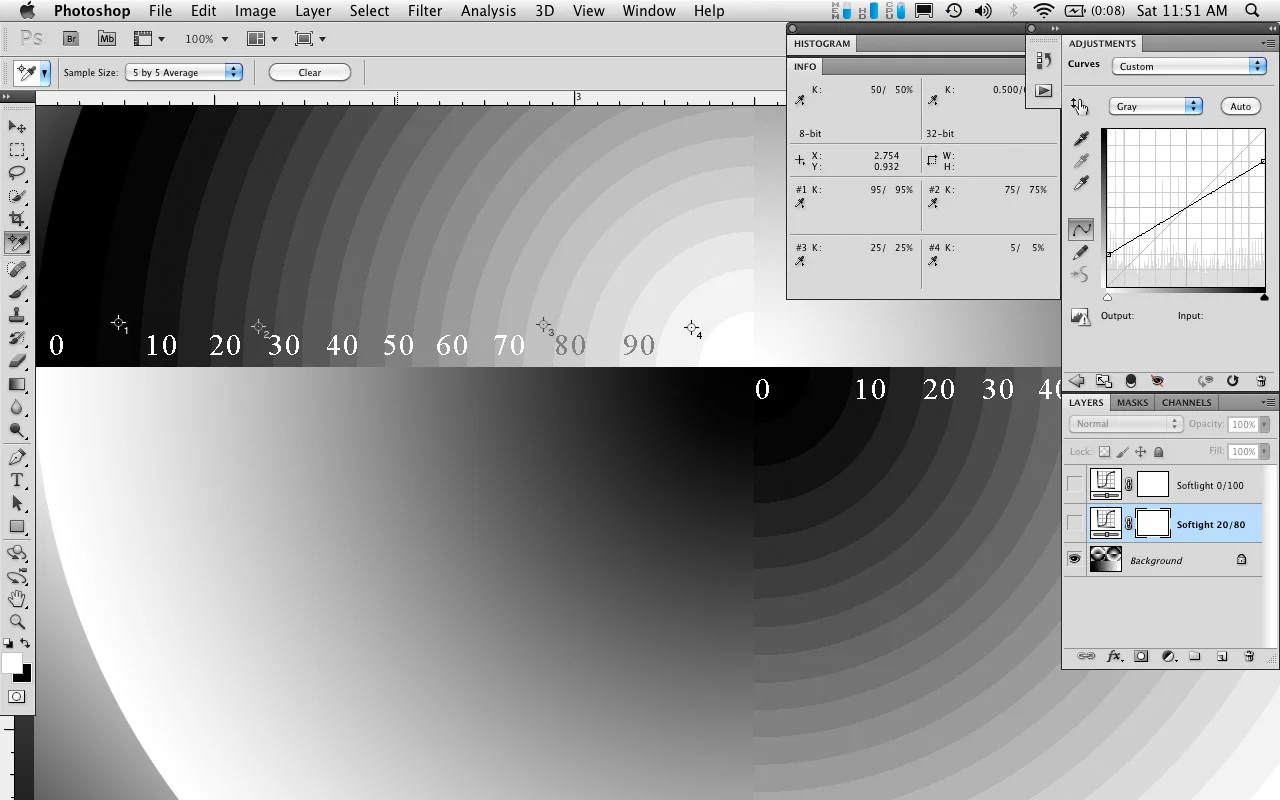
I find that making local tonal edits in Photoshop is easier, more intuitive, and more definable than using the control points and gradients in Lightroom or Capture 1 (and SEP too I imagine). In photoshop the curves/masks are easy to re-edit, use with blending modes, and then fine tune with layer and mask opacities. One thing I couldn't live without is the ability to turn the visibility of the adjustment layer on and off the and enable/disable the mask quickly see the before and after of each individual adjustment with/without the mask.
With my Digital workflow, I tend to always be moving forward and rarely do I need to go back and re-edit the raw file, so I never use smart object or do all my edits in Lightroom or capture 1. In a way it is based a more analogue style workflow: Develop the film, make proofs, and then do my dodging and burning when making the print. Each step has a specific goal and method.
Drum Scan, Invert and Correct in Photoshop, Optimize for Print or Web
Working from film scans it is much the same:
But like I said, so much of it is just experience and familiarity of the interface of the tools available to you. I try to get people to see past the immediate intimidation of Photoshop and start to work with a few powerful yet easy to use features. When some things are tried to be made "easier" like auto levels, or preset develop modes in Lighroom or Silver Efex it can often do more harm to the image than learning how to use the small number of tools that will give you the best results.
I woke up to a foggy morning today so I made a french press, grabbed the dog and camera, and hit the woods.
When I got back to download the pictures I made and started editing the images I thought it would be a good opportunity to demonstrate how you can export multiple virtual copies of the same raw file with different contrast and black and white filtration settings from Lightroom. This is to allow you to finely tune to image in photoshop with greater flexibility and less reliance on multiple and possible conflicting adjustment layers.
Since you are also working with image layers made from adjustments to the raw file the tonal range is smoother than if additional adjustment layers were made to a single file with general Lightroom/Camera Raw development settings.
Here is the scene as shot and cropped to a 1:2 aspect ratio.
In the first virtual copy, I got the overall exposure and contrast curve where I wanted—no clipping and a full range of tones. The intention was to keep this version of the image on the flat side as a base to build more contrast in Photoshop.
Virtual copy of the color version with auto black and white settings and slight increase in contrast.
I then created another virtual copy with an exaggerated yellow/yellow green filtration and increased contrast. This blows out some of the highlights in the foggy areas, which I will mask out in photoshop (I still find that it is much easier and faster to this masking in Photoshop rather than using the brush adjustments in Lightroom).
Virtual copy-2 with exaggerated yellow/green filtration and increased contrast.
Then I export those two above copies as 16-bit tiffs and then stack the contrasty version on top of the version with less contrast. I can then create a layer mask to paint in the areas where I want the yellow/green filtration version to come through. In the case above it contrast was built up with an inverted layer mask and painting with a white brush at a low opacity/fill amount to reveal differing amounts of the layer. Then I used my standard approach of burning and dodging adjustment layers to achieve the final tonal and structural balance.
Then I export those two above copies as 16-bit tiffs and then stack the contrasty version on top of the version with less contrast. I can then create a layer mask to paint in the areas where I want the yellow/green filtration version to come through. In the case above it contrast was built up with an inverted layer mask and painting with a white brush at a low opacity/fill amount to reveal differing amounts of the layer. Then I used my standard approach of burning and dodging adjustment layers to achieve the final tonal and structural balance.
Final Version
This is a variation of the same technique with even more yellow/green filtration and increased contrast. This is just to illustrate the importance of not relying on presets and plug-ins for making the initial black and white conversion and contrast adjustments.
The scene as shot
Neutral Black and White Conversion
Exaggerated yellow/green filtration and greatly increased contrast.
The final version below incorporated the lower two virtual copies on the left as well as additional curves adjustments layers, which were set to different blend modes to further separate out some of the more subtle tones. I will go more into blend modes and which ones work best in certain situations in a future post.
Final Version
Everyone is and can be creative. It is an innate trait stretching back to the first people who picked up a rock to use as a tool. Look at a toddler and tell me some people aren't born with creativity (it is everything else that gets in the way of creativity as we become adults).
If it is impossible to create something new where nothing existed previously, then new things can only be created from the transformation and connection of existing things. In art it can be thought of as making connections between seemingly completely unrelated things or ideas. Prehistoric humans didn't create the rock or the bird they killed with it. They made the connection between the rock on the ground, the bird, and dinner in their belly.
Near Egilsstaðir, Iceland, 2004
So what is creativity in the photographic sense?
It has nothing to do with visualization, Sorry, Ansel...
If all you are doing is creating things you've already visualized then the actually making of it becomes drudgery, and ultimately unrewarding. You can't learn to see anything new if all you are creating are the images floating around in your consciousness. Even less so if you are hampered by preconceptions, expectations, and rules.
What IS rewarding, and what mastery allows for, is the ability to tap into the images floating around in you subconscious. It is getting to the mental/emotional space for your innate creativity to connect all those ideas and things you have previously seen into completely new ideas—new pictures.
You can call it Zen, the Zone, Transcendence, etc. but all you have is yourself, a tool, and the thing in font of you. And it is up to you to get out of your own way and allow yourself to see the connection between them.
Please consider contributing a few dollars to enable me to continue to test new inks and papers and to develop free tools to help you take your work to the next level
(and not cluttering the site with annoying ads...)